Friday 17 December 2010

Feedback after first shoot

After shooting and editing around half of our film, we showed our work so far to the rest of the class. Once they had watched the results of our first shoot, we left the room to allow them time to give critical feedback on our film. Here are some of the points that were given to us:

- Increase brightness/contrast in occasional shots
- Include more non-diegetic sound and diegetic sound effects
- More effect on TV turning on
- More close ups

Quite a few of the points made are ones that we ourselves had already picked up on, and we will definitely take this constructive criticism into account when we do our second shoot at the weekend, as well as when we edit, to ensure that our film looks as professional as possible.

Thursday 2 December 2010

Production Evaluation (Cinematography)

Cinematographer

As soon as I took on the role of cinematographer, I realised that my main responsibilities would fall during the shooting of the film, and that has certainly been the case. I have tried to take the lead throughout the filming of our scenes, and have done this through several key aspects.
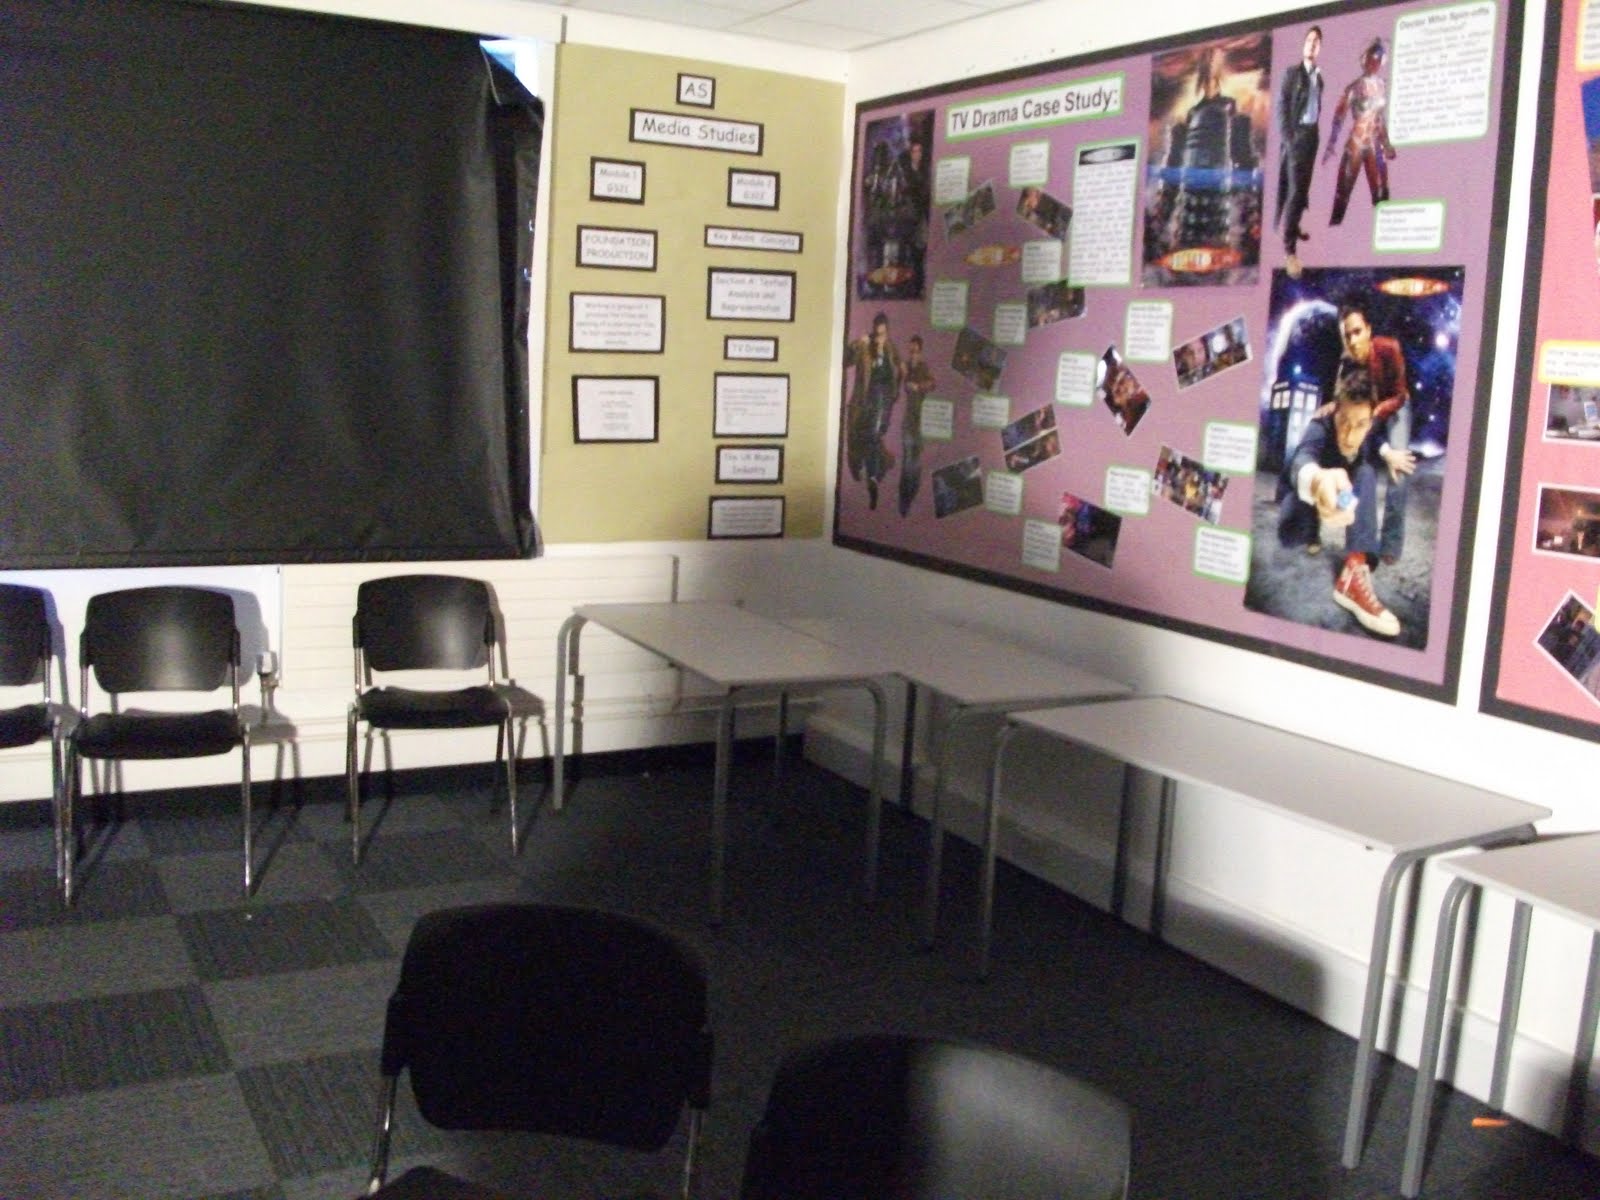
Firstly, I have assessed each location at which we have filmed, ensuring that the mise-en-scene is fitting for our genre, as well as for the ideal scenes that we wanted to shoot. Furthermore, I had to work in conjunction with the editor to check that every shot would allow for good continuity when used in the editing suite, making sure that all costumes, lighting and props stay constant throughout. Keeping the length of each shot long enough meant that the editor would also find it easier to cut each part and fit it with others; we understood completely that shooting more shots than were needed would mean we would NOT have to reshoot at another time.

Personally, one of my favourite aspects of being the cinematographer is shooting aesthetically pleasing shots with good composition, thus making the film look professionally done. For this reason, I spent lots of time before shooting each single shot to ensure that no shots were of a poor quality. Using the 'rule of thirds' (helped by a nine square grid which I activated on the camera screen), I was able to shoot each shot with good composition, making sure there was little room above the head, and not a lot of empty space at the sides of shots. This also helps in the editing suite.
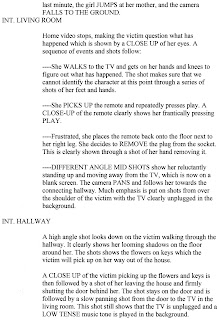
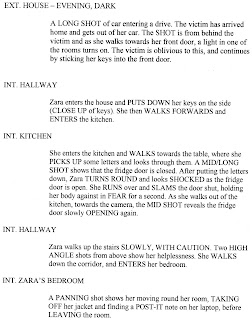
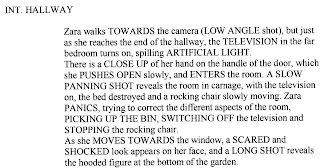
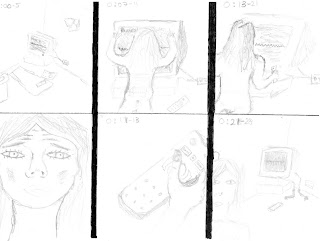
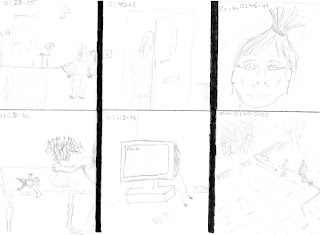
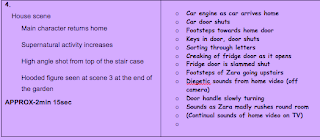
One scene I am pleased with is the scene in which our protagonist arrives home and enters the kitchen, oblivious to the fact that the fridge door is opening behind her. I managed to shoot lots of shots from various angles (adhering to the 180 degree rule) throughout the scene, using panning to add effect. Furthermore, after shooting several shots, we assessed the lighting and after deciding it was too bright on the girl's face, we changed the angles of the lights, allowing a softer light to fall onto the setting. Finally, we shot an over the shoulder shot to finish the scene, which is something we were very pleased with.

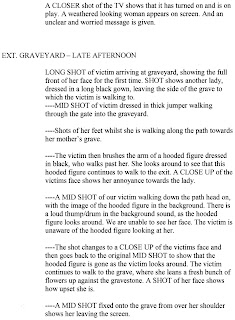
Overall, the scenes that we have managed to shoot so far look quite professional, and due to the fact that we have shot so many this will allow us a lot to use in the editing suite. However, I am most pleased with the composition and continuity of the shots, as we have used a range of shot types and angles whilst still ensuring that it is aesthetically pleasing and fitting for the horror genre. We do understand that there are some sections which may need reshooting, such as in the mother's bedroom, but our grasp on aspects such as lighting and mise-en-scene has improved throughout production, and this will definitely help when we shoot our final scene at the graveyard, and then continue to edit 'Home Video'.

Josh Murray- Incentive

Wednesday 1 December 2010


These images are from the house scene. In the picture we have our victim and our artificial lighting devices (torch and floor light). This is the scene where Zara goes in to her bedroom which is the penultimate scene.


These images are taken from our homevideo scene. This is a children play area, where we shot zara as a little girl playing with her deceased mum.


Production evaluation

Production evaluation

As role of editor it was vital for me to play a significant part in the shooting of our horror film. This is because it was important for me to see which shots worked very well on the day and which did not. At the start of each scene I was able to say on camera if the shot before was relevant and what I did or didn’t like about it, making it a lot easier when it comes down to the final editing.
Also, I liaised with the director, cinematographer and the sound designer to tell them which shots I thought would work for good continuity and composition. I asked the cinematographer if he could shoot the scenes in long parts so that when it comes to the editing I can make shots shorter where needed to make good continuity. If the shots weren’t long enough, it would have made it a nightmare. I would have had to have put several short shots together to make a longer scene. The camera could’ve been in different places and the composition may not be the same throughout if it was shot in smaller shots. I also gave advice to the director as to where the camera had to be put in order to maintain good continuity throughout the final film. And, because I already have an idea as to what the final film should look like, due to the fact that I have to edit it, I advised the director about certain shots which I thought would add the most horror affect to the final film, and would show the characteristics of a psychological horror.
To make the final sequence look perfect it was vital for me to make sure that the pace and length of each shot was adequate and fitted the scene. A shot that looked out of place, or which was shot too slow or too long had to be removed or noted down whether the shot was good or not. If the run up to our final shot was too fast, it may not have delivered the right amount of tension, because a slow shot creates fear and a sense of unknown for the audience. Also, during the kitchen scene, if the victim shut the fridge door slowly, it wouldn’t have had an as big effect as if she closed it fast. When the pace of a shot is fast, it gets the audience panicking and increases the nerves, furthermore, it foreshadows that something is going to happen towards the end of the sequence.
Finally, I made it clear to the director/cinematographer that I would like the shots to be shot in order according to the storyboard. This makes it easier to follow when it comes to editing the shots. A disorganized sequence of shots can take lots more time to edit and could cause confusion about which shot goes where.
Sam Van de Schootbrugge- Incentive

Friday 19 November 2010

Scheduling

With the planning completed, our task now turns to shooting our horror film. In the next two or three weeks, we want to have ALL filming done to allow us time to edit and add sound etc. This post shows our schedule for filming, and we will try to maintain this schedule to ensure we do not leave ourselves too much work to do in a short space of time.

Home Video: 20th/21st November

Interior House Shots: 23rd & 24th November

Exterior Shots (Graveyard): 27th November

ALL SHOT: 4TH DECEMBER

Wednesday 17 November 2010

Garageband First Attempt

The most thrilling horror films all contain a chilling and memorable soundtrack, and this is something which we want to include in 'Home Video'. Although much of the film will be silent or eerily quiet (to create tension), there are certain scenes in which some non-diegetic music will add to the effect. The below screenshot shows how we have used the software 'Garageband' to begin creating relevant music. We have used both high and low pitches on top of each other to fulfill our desire to create tension throughout.

Tuesday 16 November 2010

Pre-Production Evaluation (Cinematography)

Cinematographer- Josh Murray

In the creation of any film there are many roles which all need to be fulfilled to ensure that the film is planned, shot, edited and completed to the best possible quality. This was no different with our horror opening, although the fact that our group includes just two people meant that we realised we would have to share many jobs between us. However, we both decided on a role which we would focus on throughout the process, and I chose to be the cinematographer.

My role will be a very important one if we are to make a top quality film, and will require me to play a massive part throughout the entire shooting process.
Firstly, I will be responsible for maintaining that each setting is correct, and that all the props are positioned effectively to create the right atmosphere and mise-en-scene for our genre: in the case of 'Home Video', I will have to ensure that generic conventions such as shadows are upheld, and that effective props such as the televisions are working prior to shooting. Our aim is of course to create the best possible film, and a massive aspect of this is continuity. Although this aspect will be examined and adjusted in the editing suite, it is the job of the cinematographer to guarantee that each shot (from different angles and positions) will not reveal differing situations.

Possibly the most prominent role for me in our task will be the actual filming. Our film must be between 4 and 5 minutes in length, and after writing our script, step outline and written storyboard we managed to decide on 78 shots that would be needed. It will be my job to position everything in the scene (the actors, props and lighting) as well as the camera itself, and then shoot the scene; this could mean I just stand there and watch over the action, or use the camera if tracking, panning or zooming is needed. As I wish for our film to look professional, I will take it upon myself to reshoot any shot which looks poor or are not completed in the way that we envisaged.
However, although we have decided on a definite amount of shots, this is going to be flexible, and I believe that we will shoot over 100 shots to create a lot of items to be used by the editor. These decisions will again lie with me, and I will confer with Sam when making changes or additions to shots throughout the film.
The relationship between the cinematographer and the editor is vital, and Sam and I will make sure that we always talk through the shots that I am going to take, as it will be he who has to work with the shots in the editing suite.

An important resource that we have used throughout our planning process has been the various films that relate to our sub-genre of psychological horror. The ones that inspired me most as a cinematographer were 'The Grudge' and 'The Ring', as both use camera angles and mise-en-scene to enhance the tension and fear which is already evident through the setting. Firstly, the use of televisions as a tool for the supernatural in 'The Ring' is something that we are very keen on using, and I have already planned several canted angle shots of the television which will create a sense of confusion in the first and final scene. Furthermore, there is several high angle shots in both films (especially on the stairs) that show the position of weakness and loneliness that the protagonist finds themselves in; this is something I plan to shoot as our female character ascends the stairs cautiously. Finally, the way that the film openings are shot allow the viewer to understand that something 'supernatural' is going on, whilst keeping the narrative restricted, as we are never certain of what is occuring. This is something I will concentrate on in the final scene, when the character begins to feel uncomfortable.

Overall, my role as cinematographer will mean that I must take a constant interest in the entire shooting process; ensuring that the scene is perfect BEFORE the camera begins to roll, at which point I will stand behind the camera and shoot the entire scene. Although it is a lot of work, I feel that the role will be both enjoyable and rewarding, and I can learn a lot about the processes as I go along.

Friday 12 November 2010

Sound Step Outline

These sheets link with the previously completed step outline, adding the important element of sound. Using this exercise, we have planned all of the major diegetic and non-diegetic sounds which will be heard in each scene of our film. Almost all of the sounds will be relevant, with very little contrapuntal; this is visible in what we have written.

Pre-Production Evaluation (Editing)

Editor- Sam Van de Schootbrugge

In order to produce the best possible film we needed to designate certain roles within our group. I chose to focus on the editing.

My role as editor is important for an excellent film. I get given the several hours worth of shots and filming, and must decide which of them look best. My job is to deliver good Composition and Continuity throughout the final 5 minute assessed piece so that the film can be scary for all the right reasons. Bad editing can lead to the audience becoming bored, the film not being scary where we want it to be and it could deliver the wrong messages.

I must produce something that is enjoyable to watch and in order to this I must have the idea for what our group wants our film to look like constantly in the forefront of my thoughts. This idea that we have set out to portray comes from several horror films that we have seen and enjoyed in the past. My other group member and I also wanted the film to be a horror which keeps the audience constantly thinking. We didn’t just want to make a ‘slasher’, because we believe that this could become cheesy and is and easy way of making a horror. We believe making a supernatural/paranormal horror would make it enjoyable to film and to edit, and would be the most effective way of scaring our target audience.

Also, as part of my role I will advise the director/cinematographer on shots and shot lengths depending on what I believe will look nicest when edited. I will also need to ask him to take as many shots as possible and at the appropriate length so that I can make the most of the material I receive and will then not have film it again.

The films that inspired us to follow this type of genre are classics such as ‘The Ring’, ‘Poltergeist’, ‘The Grudge’ and ‘Psycho’. For me they were great examples of perfectly edited films and also contain the same sub-genre; psychological horrors. The TV scene in The Ring is edited in such a way that we can really sense that something ‘supernatural’ is going on. Poltergeist also has a very classic scene with the TV in the bedroom. This scene is also edited to shows supernatural things happening. The Grudge has been edited beautifully by putting in lengthy shots to add tension and it slows down the pace to gets viewers on the edge of their seat during the more tense scenes. This example is what I am looking to do in our opening. The more tense shots will be longer in time than the shots where we don’t want to portray as much tension. Just before the end of our opening sequence I will try to increase the pace to add fear and anxiety to the audience (see shots 59-61 on shot list). Shots shown in the graveyard I will try to make long enough to show that the hooded figure is a threat, but I won’t make them too long as it could add unnecessary tension.

My role is largely towards the end of the filming process, but I will still be advising and contributing towards all aspects of the opening sequence.

Wednesday 10 November 2010

Sound Analysis- Horror Openings


One of the most important conventions of a horror film is the sound. Although it often goes unnoticed, it can be used to build up suspense and tension, as well as being used as a tool to shock the audience. In this exercise, we researched two psychological horror openings that we had already watched and analysed both the diegetic and non-diegetic sound. Some of the things we discovered may well be used in our film (such as the rustling of leaves).

Reccee Sheet


These sheets are used to show that we have 
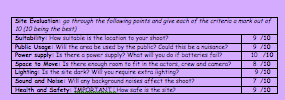
permission for using the location in which we want to film. Also, it allows us assess whether it will be the best place for our shots, as well as looking at health and safety and the ability for us to shoot here.
The photo's are shots of the location that is going to be most used. One is of the TV, where the homevideo is shown, another is of the hallway in which we will have the longest shot to created tension before the final scene. The other one is of the mothers bedroom which will be messy during the filming process


Make Up Design Sheet


This is our make-up design sheet. As you can see we will be usingminimal make-up as there is no blood involved in the making of our film. However, costume is the vital element.

Tuesday 9 November 2010

Written Storyboard


One of the most time consuming parts of planning is the written storyboard. On this document you write down the shot length, type and style as well as what will be occuring in each single shot for the entire length of film. Although we are fairly certain that some aspects may change, the majority of shots that we have decided upon and written into this storyboard will indeed be in the film.
The TOTAL TIME of all 61 shots together is 4 mins & 12 secs.


Home Video Script

This is the script we are using for our assessed film piece. It contains 4 and a half minutes worth of script all of which is relevant to the film.


(NB. A change has been made to the INT. LIVING ROOM scene: where 'strange angles' has been written, we will be shooting the shots at a canted angle.)

Production Schedule and Information


These sheets give us proof of actors details and confirmation that they can perform, as well as a checklist for equipment (such as lighting and props) and information on the locations that we will be using for filming.


Test Shot

This is our main character (Zara) dressed as she would be during the graveyard scene. She is dressed in black to show her grief as she is visiting her mothers grave.
This is ideal for the horror genre.
The character will also be wearing some slight white make-up to add to her paleness, emphasising her innocence and vulnerability.

Friday 5 November 2010

Health and Safety Sheet


This sheet gives proof that we have any permission to work where we are going to film, as well as ensuring that all locations are safe.

Textual Analysis Sheet 2


This task allowed us to do research into films of a similar sub genre to ours, and analyse the openings. I chose Gore Verbinski's 2002 classic 'The Ring', and considered the use of camera angles, lighting, music, locating and mise-en-scene to have an effect on several aspects of the film. Some of the things that I discovered may well have a positive effect on our own piece.

Saturday 23 October 2010

Drawn Story Board (1min)

As part of our planning for our final assessment piece, we needed to draw a 1 minute long storyboard. This 1 min has got to show all the basic shots and approximate shot lengths. I decided to take the 2nd minute of our film.
The storyboard begins with our main character sitting in her chair watch the home video that her mum left her. However, for some unexplainable reason the screen freezes. This first shot is then followed by a close up of the victims face, which shows confusion. This is followed by a shot where she goes to the television to see why it has stopped working. She tries to press play on the remote, however this doesn't seem to work, so she unplugs the TV and walks out the room.
The second half of the storyboard starts with our victim deciding to leave to go to her mums grave. This is shown by a 'mid shot' of her walking to the front door from the living room. This is -followed by a 'mid-close up' of the victim picking up a bunch of flowers and her keys from the table next to the door, to indicate that she is going to her mums grave. After this we get a shot of her leaving the house and the door shutting behind her. We then get our first sense that there is something not quite right in the house, because as soon as the victim closes the door, the TV turns back on and continues to play even though it has been unplugged. We are then left with a close up of her mum finishing the home video with a message that reveals something shocking to the audience. After the scene at the house, we go straight to the graveyard. This is shows with a long 'long shot' which tells us where the next scene is taking place, and also reveals a strange figure who has just come from the victims' mums' grave wearing black.

Friday 22 October 2010

Pitch

Film User Ratings

Another exercise which allows us to consider our
target audience is to look at the user ratings on IMDB of several films of our sub genre.

This first graph shows the data for the 2002 horror film 'The Ring'. It is obviously fairly quickly that this film is much more popular with men than women, which may be seen as the stereotype with films of this sub-genre. Furthermore, the age groupings show that the most votes were cast for people between the age of 18-29, which again fits with the classic target audience. This was certainly the information we hoped the find, as our target audience will be the same as that of 'The Ring'.


The second graph shows the user ratings data for 'The Grudge', starring Sarah Michelle-Gellar. Similarly to 'The Ring', it is the male audience that have largely viewed this page, and the males aged 18-29 are once again the largest sub-section. Furthermore, the males aged 30-44 (which had a big further for 'The Ring') have a large effect in this graph.


One of our favourite psychological horrors that we used as research was Steven Spielberg's 'Poltergeist'. As with the previous two, there is the common audience of males between the ages of 18-29 and 30-44. However, one slight difference is that this film appears much less popular with females than 'The Grudge', and this may be down to the protagonist; Sarah Michelle-Gellar plays the main character in 'The Grudge' whereas there are several protagonists in 'Poltergeist', and possibly less emphasis on young women. This supports our choice to place a teenage female as the main person in our film.


The final film which we researched on IMDB was the classic psychological horror starring Bruce Willis, 'Sixth Sense'. Firstly, it is obvious to see that this film is without doubt the most popular of the four that are on this post, and yet it still supports the classic demographic which has been a constant in all of our films, with males making up the majority of viewers and emphasis placed on those of a younger age.

Using this information, we can see that aiming our horror at a younger audience (between 18-35) may well provide most success, as well as choosing a female protagonist, which may well appeal to both sexes.


Classification

As we are making a horror film, we realised that classification was a rather important and slightly controversial subject. In this post we will illustrate the subtle differences which make the two guidelines slightly different.

Obviously, a film which carries a 15 certificate should not be watched by anyone under the age of 15. The basic guidelines suggest that controversial areas such as sex, violence and drugs may be shown regularly so long as they are not overly done (or in the case of drugs, not shown to be endorsing them.)
In the case of horror themes, 15 films are fairly flexible in showing any menacing scenes, unless these scenes are deemed as sadistic.


18 is the final classification (excluding R18), and states that only people over this age are permitted to watch these films. The main difference between this classification and the one before it is links to sex: in 18 films, sexual scenes can be much more visual and possibly crude. Some of these films may be seen to be pornographic, and so are deemed 18. However, there are very few other differences, which leads us to the conclusion that our film (which will not include sexual references) will be classified as a 15.


Textual Analysis


Step Outline (13th October)

Description of what is happening scene by scene

Number of shots in this section

Average length of shot

  1. Home video scene: mum, who is dead, leaving main character a message.

Titles at the bottom of the screen

Ending with the Title of film at the end of the home video

APPROX-1min

3 shots – 3/4secs each approx

4/5 shots – 7-10 secs each approx

  1. Intro of main character

Getting ready to go to mum’s grave

Start of supernatural activity

APPROX-45secs

7 shots – 3-9 secs each approx

  1. Long shot/graveyard scene

Main character at the graveyard

Long shot of her going to grave

Including unknown hooded figure

APPROX-1min

2 shots – 8 secs each approx

4 shots – 2-4 secs each approx

3 shots – 7-10 secs each approx

  1. House scene

Main character returns home

Supernatural activity increases

High angle shot from top of the stair case

Hooded figure seen at scene 3 at the end of the garden

APPROX-2min 15sec

4 shots – 3-8 secs each approx

3/4 shots - 2-6 secs each approx

2 shots – 10-15 secs each approx

2/3 shots – 3 secs each approx

Wednesday 20 October 2010

Lighting Lesson Photos

This first photo shows the use of just one light: the key light. It is focused on one side of the characters face, thus creating dark shadows both behind him and on the opposite side of his body and head.
This second image is again created through the use of solely one light, which in this case is the back light. The character stands straight in front of the light to create one large shadow. This technique may be useful in our horror film to create areas of darkness which may be able to move and therefore create tension.
This image shows the use of a red gel, which is placed in front of the key light to alter the colour of the shot. It creates a rather evil, sadistic effect, and with the addition of a fill light, one side of the face is more lit than the other.


This final image shows the use of a fill light (torch), which has been placed behind some paper so as to distribute the light more evenly, stopping the harshness which may come with just the torch. In this case it has created a half of light and a half of shadow, which may well come in useful with our horror.

Lighting Lesson

One of the most vital aspects of cinematography is lighting: without decent lighting each scene will look amateurish and it may lose some of the effect which was intended. By using light in the appropriate way, it is possible to add tension and emotion by creating shadows and definition.

One of the most basic lighting techniques is '3 Point Lighting'. Although this method may not be particularly useful in the genre of horror, it can allow you to shoot good quality scenes. Its name is relevant to the technique, as three separate lights are used to illuminate the character, prop or setting.
The first light is called the 'key light', and this is the main source of illumination. The key light is usually placed at around a 45 degree angle away from the camera and is focused on the subject of the shot, brightening the face.
The second light is called the 'fill light', and this is there to accompany the key light. The fill light may be situated 45 degrees in the opposite direction from the camera, and its function is to eliminate shadows which may be created by the key light. It must also be less intense (so possibly placed further away) to ensure that there is not too much light.
The final light is placed behind the subject, and so is aptly named the 'back light'. This serves the purpose of eliminating the prospect of lack of definition or dimension with the character in shot, and so it defines the shoulders and head of a person to make them look 3D.

Obviously, although all three lights can be used simultaneously, it is often possible to use just one or two which can enable the creation of various effects. One good example which we are planning on using in our horror is to solely place the back light behind the character as she enters a room; this will create a silhouette of the girl, as well as shadows around the door.

Monday 18 October 2010

Title Sequence Research

The main purpose of this exercise was to research and watch several horror film/TV series title sequences, giving us the opportunity to see what is common in each, as well as take inspiration in the way that these are created, such as from the images, music and composition. The films we watched were 'Dawn of the Dead', 'Blade II', 'True Blood' and 'Halloween'.

Evaluation of Previous IB Work

Although we had begun to have ideas about how our film would be shot and created, we were still rather unsure as to what is expected of our films and their quality. In this exercise we watched several films created as part of the IB Film Studies course, and then evaluated them for aspects such as composition, continuity, shot types and originality, before scoring each out of 30 and then discovering the actual mark which each received. After doing this exercise and seeing the results, it made us feel a lot more confident!!!

Narrative Analysis Chart